|
|
||||||||||||||||||||||||||||||||||||||||||||||||||||||||||||||||||||||||||||||||||||||||||||||||||||||||||||||||||||||||


|
||
Key |
Function |
Remark |
d |
Demo mode |
Switches demo mode on / off. |
h/H |
Online (quick) help |
Displays a short list (two pages) of key commands. |
i |
Onscreen info |
Enables / disables the on screen display of additional info. (E.g.: active modes and physical variables as speed, time, time factor...) |
1 |
Camera mode 1 - 'linked' |
Camera direction follows the selected target body. (Note: If the target body is far away, you might no see it at all this way.) |
2 |
Camera mode 2 - 'body to body' |
Camera views target body A as seen from observer's body B. |
3 |
Camera mode 3 - 'orbiter' |
Camera orbits target, allways pointing towards target body. |
4 |
Camera mode 4 - 'free' |
Use your cursor keys, your mouse or your joystick to guide the camera. |
w |
Camera "follow mode" |
Camera follows selected spaceship to enable it's contol / navigation. (Current target must be a spaceship.) |
|
||
Key |
Function |
Remark |
Arrow keys |
Camera/Spaceship control |
As in most 3D programs, the arrow or cursor keys control the direction you're facing. |
Page up / down |
Increase / decrease speed |
Accelerates the camera / spaceship along the z-axis (simply put: into the monitor). (Useful in free camera or spaceship camera mode.) |
+ / - |
Increase / decrease time factor or compression |
The more time compression is increased, the faster the objects around you will move. A negative timefator will move everything backwards! A timefactor = 0 is excellent for positioning for a screenshot while all other objects stand still. |
Home / End |
Select previous / next target body |
You can change the object you'd like to view with this key when in camera mode 1-3. (Cycles trough all objects within OU.) |
SHIFT Home / End |
Select observer's body |
Useful, when in camera mode 2 - 'body to body' or to select a reference body for navigation |
n |
Move camera near target object |
Useful in camera mode 1 and 2 |
p |
Pause |
Go, get a snack. OU will wait for you. (At least for the next 5 billion years ;-) |
S |
Screenshot |
Takes a screenshot of the complete current scene in JPG format and stores it in the scrshot folder in your OU directory. (You might want to disable OU's on screen info text 'i' first!) |
j |
Joystick control on /off |
|
|
||
Key |
Function |
Remark |
Insert |
Trail on / off |
Toggles current target orbit trail. (Applies to planets, asteroids and comets, only.) |
b |
Labels on/off |
(Useful to locate and distinguish remote bodies.) |
B |
Stars labels on/off |
(This aplies to Messier object's labels as well.) |
e |
Real time on / off |
(OU time will become equal to your current local time.) |
G |
Display logo |
(Logo will fade out in a few secs, again.) |
t |
Texture on / off |
Detailed / uniform object surfaces. |
l |
Light on / off |
Object shading on / off. |
f |
Flat / smoothed surfaces |
Object smoothing on / off. |
a |
Atmosphere on / off |
(Currently available for Earth, only.) |
r |
Top view map on / off |
Displays an overwiew map of the solar system as viewed from above. (See below.) |
s |
Stars on / off |
Hides / unhides stars. |
m / M |
Increase /decrease stars' brightness |
|
o / O |
Increase / decrease FOV |
Field of view. (Much like an optic camera's zoom.) |
u / U |
Wider / narrower range in top view map |
|
y |
Gravity on / off |
(Affects spaceships only at this time.) |
z / Z |
Increase / decrease zoom factor (camera distance from target) |
(Only available in camera modes 2 and 3.) |
To make life a bit easier for you, we suggest you simply print out these short lists and place them near to your keyboard or monitor. As we mentioned above, after a very short period of time you won't need them anymore.In case you need to know a single command, simply press 'h' anywhere in OU to display the quick help on the screen.
Spaceship control:
Once you're in follow mode with an spaceship you'll be able to control ship with the arrow keys (see previous section). You'll notice there're some "X"s on the screen in diffenrent colors:
X : Where the gravity pulls the ship to.
X : Where the ship's nose is pointing towards.
X : Where the ship is moves towards (this is not necessarily where its nose is pointing :-).
X : Where the ships is comes from.
.
GUI, the User Interface:
If your 3D card supports OpenGL in a window then you're lucky as you'll be able to run the GUI version of OU (ou.exe). If you're getting weird colors or it simply won't work don't panic, we've included the non-GUI version for those of you with older 3D cards (ounogui.exe or see INSTALL under Linux).
This is our first GUI version and while we know it's still incomplete we think is quite useful, especially for selecting bodies (no more painful bizarre keystrokes). The GUI is very simple, just a frame on the right side of the screen and a couple of pop-up windows (used mainly for runtime options). But it allready get's the job done quite perfect :-) Because we believe an image's worth a 1k words:

This is what the GUI looks like when you run OU for the first time. Depending on the active camera mode some controls may be disabled.
- 'Source' and 'Target' allow a quick body selection (note that 'Source' also sets current reference body and thus both distance and speed will be relative to the source body you have selected at the time).
- The 'Go There!' button is very useful in Free and Linked camera modes. It will move the camera to a position nearby the selected target body.
- Guess what camera mode does?
- FOV is the control for Field of View (much like an optical zoom)
- ZOOM is used for camera distance adjust in B2B and Orbiter camera modes (also plays its role in Follow mode, see below)
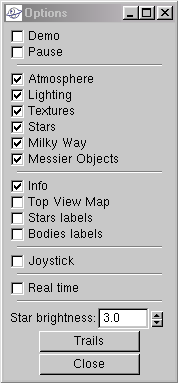
- Options pops up a window with several (hopefully self-explantory) runtime options. Click on Trails button to enable/disable orbit trails for all major bodies.
Just play around with the available options here. You will soon have a feeling for each and every of those tiny boxes and how they combine :)
|
|
|

As mentioned above in the Keystroke department: If the current body is a spaceship (recognize that one? =) you'll be able to check the 'Follow' box and enter the Follow mode. Now you're able to control the ship's movement:

Use Heading and Roll/Speed to control the ship (tip: if you hold ALT pressed you'll be able to adjust one parameter at a time). Use CTRL+PageUp/PageDown to make the ship match current source body speed (not very realistic but fun and useful :-).
Camera movement with the mouse:
Besides GUI navigation you can use the mouse to move the camera when in free camera mode. Just left click over the rendering window and drag the mouse while you keep the left button down.
Closing the OpenUniverse:
Just press the 'ESC' key when you'd like to leave OU at any time, in any situation.
We hope though, you have enjoyed you stay and will come back as you like. Please don't hesitate to tell your friends about OpenUniverse and www.openuniverse.org. You're welcome and thank you for joining us ;-)
Tunining OU or command line parameters made simple (WINDOWS ONLY):
Command line parameters are quite important if you want to squeeze the best possible picture, the highest possible speed out of your system and your graphics card. Remember, the better your configuration, the better OU will look.
We recommend however that you write down the settings you started with (eg. no settings, meaning default settings) as a save base before you tweak the following parameters:
ou.exe -fullscreen 640x480:32@70
Where the first parameter 640x480 is one possible resolution, the second one is one colordepth and the last one is one refresh rate. This command line will run OpenUniverse in an resolution of 640x480 pixels, a colordeph of 32 bit (truecolor) and at a refreshrate of 70Hz. Please note that the characters 'x' and ':' are important and can't be removed (you don't have to suppy refresh rate if you don't want as it'll use default refresh rate for the supplied resolution). Note as well that a lot of 3D cards are only capable of resolutions up to 800x600 and colordepths up to 16bit.
- You can easily use the command line option when you right click the shortcut on your windows desktop we created in the last step. If you then select 'properties' an dialog box will pop up. Behind 'target' it will display the complete path actually it points to. In this case the field may look much like
C:\programs\ou\ou.exe.
To use the comand line parameters, place the cursor behind the ...ou.exe and type your parameters. Keep in mind that the whole line often can't be displayed in that field, so it may only show a part of it. The whole line may then look much like:
C:\programs\ou\ou.exe -fullscreen 640x480:32@70
But your milage may vary ;-)
Performance tweaking:
We've tried to make OU run as fast as possible (there's still a lot of room for improvements and optimizations though) but as there're so many different system configurations you'll have to help OU to run as fast as possible with the nicest visual quality. So, edit the ou.conf file located in the program root directory (windows) or conf subdirectory (Linux, most likely /usr/local/share/openuniverse/conf). Look for the LOD tag (level of detail) and select the value best fitting your 3D card. You may also want to adjust the color depth (just below LOD), font tags and texture compression (if your card supports it, read GeForce family). Just play around with these three config parameters until you're happy with performance/quality.
It can be helpful to change the resolution for performance reasons as well, as quite a few old 3D cards are limited on that. See 'Tuning OU or command line parameters made simple' on how to achieve that.
Useful Tips :
- When controlling a spaceships you can match current source body speed by pressing CTRL+PageUp.
- If you're looking for something set time factor to 0, camera mode to free and use the mouse to move the camera (see mouse section above).
- Hold SHIFT to accelerate spaceships way faster.
- Hold SHIFT to allow a much faster increase/decrease of timefactor (both in GUI and keyboard commands).
History:
OpenUniverse (OU) was formely known as Solar System Simulator (Ssystem). It was initially released on Nov 1997 with the intention to create a rotating Earth display on a main stream PC. Since these early roots a continuing development and expansion has taken place.Was version 1.0 only aware of the major bodies (planets), version 1.2 added a whole bunch of moons. Solar System v1.6 then added more ways of movement for the user's eye (camera) within Solar System's virtual universe and last but not least better textures for a lot of bodies.
This version, called OpenUniverse (OU) finally has been renamed to underline the concept behind the further development of the program: Open for the whole Universe, not just the solar system. Open to use, extend and change. Finally open for all users, programmers and for you. :)
Programming OU has allways been a process of merging new creative concepts with physics, art and code. An expansion of frontiers bringing together quite different people with their own ideas, backgrounds, questions and abilities.
Future:
This finally is the paragraph to philosophate a bit, don't you think? We are all interested in the future, all the time. Whether it's the job, friendship or the complicated and often confusing live in general - why should OpenUniverse make an exception?
Considered all that, to what it boils down to here is amazingly enough rather simple: We are continuing the development of OpenUniverse, so you'll see future versions pop up at www.openuniverse.org as soon as they'll get available. The progress will of course depend on all those people willing to support and contribute to OpenUniverse in the future. So if you think you've got an bright new idea, if you've got new material (eg. good textures or 3D models) about planets, moons, spaceships and such or if you even program with OpenGL please don't hesitate a single second. Check our site or look under 'First contact' in this manual.
Since OpenUniverse's needs will certainly shift over time, we will continually post our new ideas and our kind requests for especially needed resourses on our OU discussion forum. Please read 'our' as in 'we and you' ;-)
To wet your mouth here's finally a little bit of info about our ideas for the next months: We'll of course try to complete the collection of larger bodies. Expect to see a lot more moons of Saturn and Uranus pop up, whether they are spheric or irregular. That means we have to come up with quite a few new textures based on the official NASA images. Since these images are often just b/w and or incomplete quite some ammount of work and 'guess how' will flow in this. The next issue will be the improvement of OU's usability. That will be the simplification of controls, user keys, camera modes and an even more improved GUI (Graphical User Interface). The last big bang will be the expansion of OpenUniverse to our galactic neighborship. The surrounding solar systems will be included, hopefully featuring their already proposed planets. How we'll reach these new frontiers? That is exacly one of the challenges ahead of us. And we love it! =)
First contact:
If you feel interested in OpenUniverse and like to make any sort of contribution, whether it is a hello, a suggestion, a mirror to download it, to spend a few nice and new textures, 3D objects or even to participate in it's further programming and documentation. You are welcome.
Just give Raul Alonso a short mail.
Authors:
Raul Alonso: Programming, textures and 3d models tweaking.
Axel Groll: Documentation, artwork (splash screens, logo).
Acknoledgements:
A big THANK YOU to all the people who helped since Raul started this little project (in late 1997), go to www.openuniverse.org for an up to date list
Quote for the day:
There is such a thing as a free lunch. You can't buy it though :)